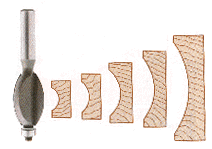
 A core box bit is useful
on flat faces, especially on a routing table against a fence. You can change
the depth of the cut by adjusting the bit. You can get these anywhere, even
in cheap 1/4" shank versions.
![[wooden ball machine]](wood-1-sm.jpg)
You can see a larger image of the machine in action while you listen to a 50 second (439k) mp3 of the machine in action (yes, that's a large file, but this noise doesn't handle compression well). That's the sound of six bearings in flight, reaching the bottom tray and then being hand shuttled back to the top a few times. Thanks to Matthias Wandel for giving me the idea to put up a sound clip. His marble machines make much more interesting sounds.
The Y-on-its-side just below that is both a delay and a flip-flop. It is slightly counterweighted (from behind) to rest in the clockwise position. Balls enter from the left (in the picture that has just happened) and tip the whole thing counter-clockwise and the ball comes to rest against the edge of the exit path. The next ball goes over the top and dislodges the first ball, releasing them both simultaneously.
The dead-end looking path on the left towards the bottom is actually a tipper, counterweighted from behind. Balls roll onto it and it lowers them onto the (uphill) path just below it, where they join balls coming down from the other direction.

 A core box bit is useful
on flat faces, especially on a routing table against a fence. You can change
the depth of the cut by adjusting the bit. You can get these anywhere, even
in cheap 1/4" shank versions.
 The hard-to find bit is an edge-fluting bit. It makes a fixed-depth flute
in the edge of a workpiece, guided by a ball bearing at the end of the bit.
You can route the edge of any shape. The Amana #54302 cuts a 1/8" deep groove
with a 5/16" radius, perfect for the 5/8" bearings I'm using. I got
mine from
Ballew Saw & Tool.
In my experience it seems like it would be easier to use this in
a routing table, but in reality that's a great way to launch your small
workpiece across the room. It's much easier to control freehand.